
This article was originally published by Andrii Kladochnyi in the Ukrainian language.
Andrii is a web developer with a passion for JavaScript. Follow him on LinkedIn.
Basics of Practical Phishing with Gophish
Hello! My name’s Andriy and I’m a JavaScript developer. That said, I’ll be using this article to share my knowledge on a topic that isn’t entirely related to web development. The Russian-Ukrainian war, as a true 21st-century conflict, is seeing hostilities accompanied by a variety of information operations. In order to better protect ourselves and those around us, we should all have an understanding of what dangers await us online.
This article is dedicated to one of the most common methods used to acquire personal data – phishing attacks.
Disclaimer! This article is not a call to break the law – it’s just a practical demonstration of how phishing works. The article has been published with the support of Nikity Knysha and HackYourMom.
Phishing is a form of social engineering aimed at tricking inattentive users into surrendering their personal data, such as passwords or credit card information. Let’s take a moment to talk about a tool that allows you to simulate a phishing attack and understand how they work in practice – the open source phishing framework known as Gophish.
Gophish Technical Review
Since Gophish is an open-source project, the framework repository is located at Github. The tool itself is written in Go. There is also an admin UI that allows you to manage phishing campaigns and everything you would need for them. By default, Gophish uses a SqlLite database, but you can also utilize MySql if necessary.
For various integrations and automations, Gophish also provides a REST API and Python client library. The framework itself is a tool for creating, planning and monitoring phishing campaigns, as well as creating and managing lists of email addresses, email templates and phishing pages. However, it doesn’t have an SMTP server function, so you’ll have to integrate a third-party solution to send emails.
This article is divided into 2 parts: installing Gophish on a virtual machine in AWS and running your first test phishing campaign. If you’re not interested in the technical aspects of deploying the tool, feel free to skip to Part 2, where you’ll see the framework in action.
Deploying Gophish
In order to run Gophish, we need a Linux or Windows server that’s publicly accessible from the Internet. The easiest way to get one is to set up a virtual machine on any one of the popular cloud services (AWS, GCP, Azure, Digital Ocean). These providers often offer free credits for first-time users that should cover the “costs” of our demonstration. Let’s use the most popular one — AWS – for this demo.
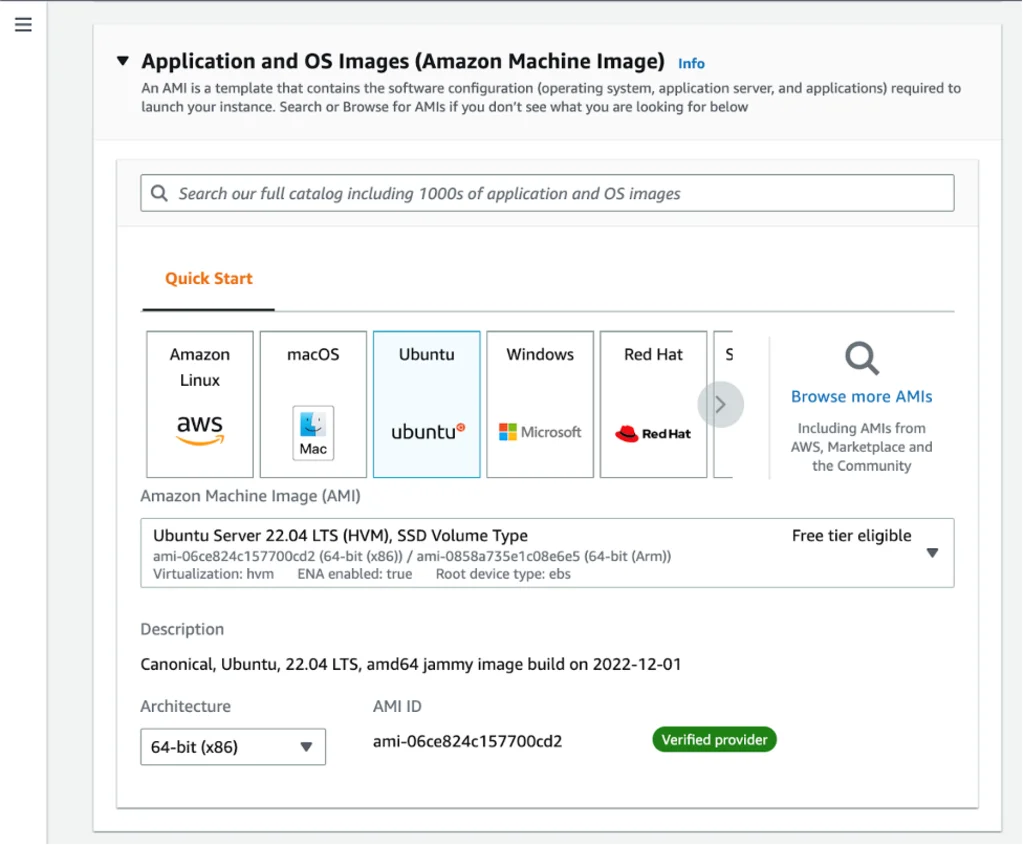
To create a new virtual machine in AWS, head to the EC2 management console and click the “Launch Instances” button. We’ll be using an Ubuntu operating system for our machine.
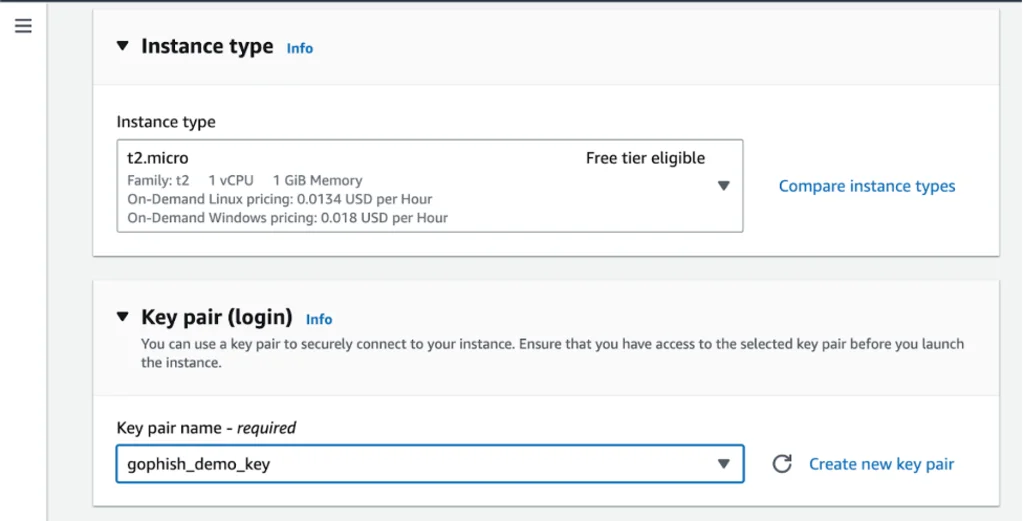
Now we have to choose the type of virtual machine we want, and the t2.micro is perfect for our purposes, as the size of this machine is compatible with AWS Free Tier. We’ll also need to select either an existing pair of keys or create a new pair in order to connect to the machine via SSH.
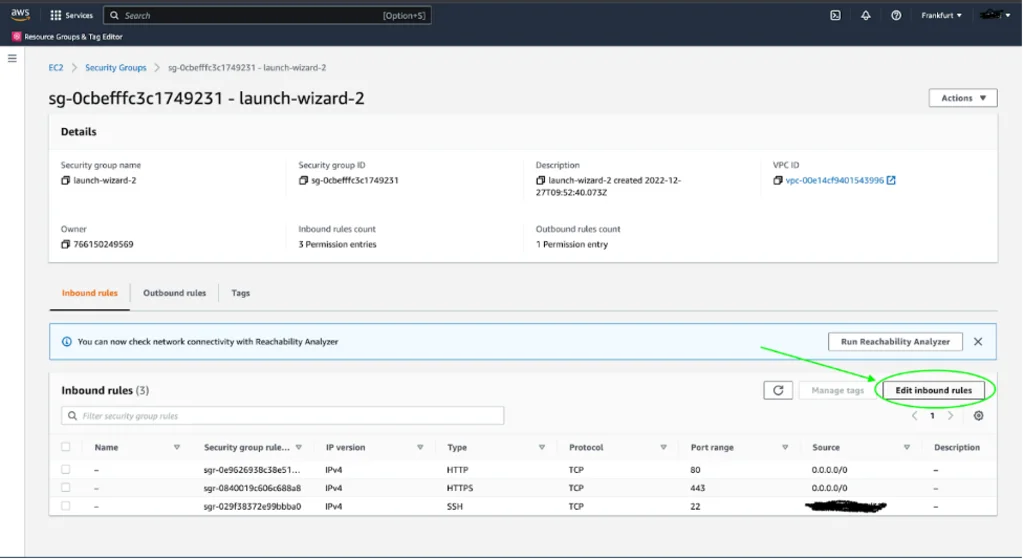
Now, we need to head to Network Settings in order to specify the network rules for accessing our virtual machine. Let’s create a new security group with the following rules:
- Allow SSH traffic only from our IP address.
- Allow HTTP and HTTPS traffic from the Internet. The Gophish server will host the phishing pages and we want these pages to be accessible to the potential victim.
We’ll come back to these settings a bit later, when we will be going through our Gophish configuration.
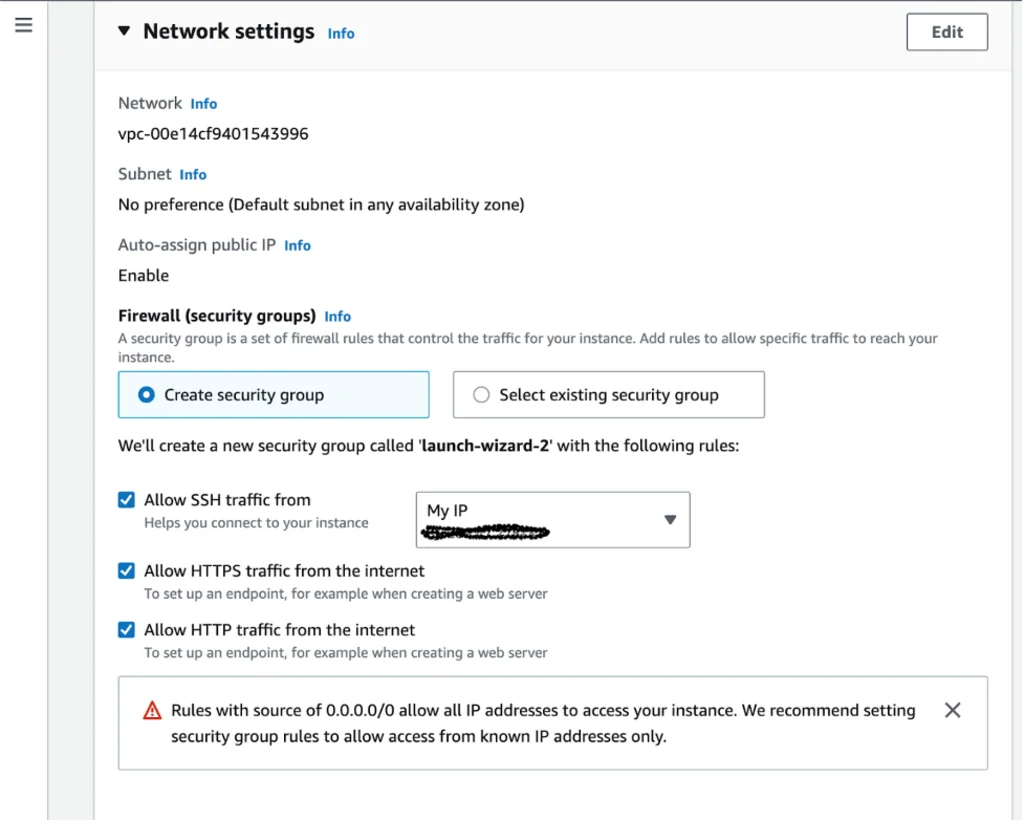
All other settings can be left as-is.
How do we connect to our newly created machine? All you have to do is select the instance in the EC2 admin list and click Connect.

To connect via SSH, follow the instructions in the tab labeled “SSH Client”. You will also need the SSH key that was generated when you created your virtual machine. I’m going to run a command from the folder where the key is located to do so, and my syntax looks like this:
ssh -i "gophish_demo_key.pem” [email protected]The easiest way to install Gophish is to download the archive file with the tool that’s already been compiled for your operating system. (You can also use Docker Container or clone the repository and assemble the project yourself.) We’ve just created a virtual machine running Ubuntu, so now we need an archive with a Linux build. Let’s download it with the following command:
wget https://github.com/gophish/gophish/releases/download/v0.12.1/gophish-v0.12.1-linux-64bit.zip
Create a new directory and navigate to it:
mkdir gophish
cd gophish
Now we need to extract the contents of the downloaded archive into the current directory:
unzip ../gophish-v0.12.1-linux-64bit.zipVerify the contents of the current directory, which you’ve just extracted from the archive:
lsYou should see the following files and sub-directories:

The db directory contains configurations and database migrations. The directories static and templates both contain UI files. gophish is the binary file that we are going to run, and config.json is a file that contains the tool’s configuration. Let’s verify its contents.
cat ./config.json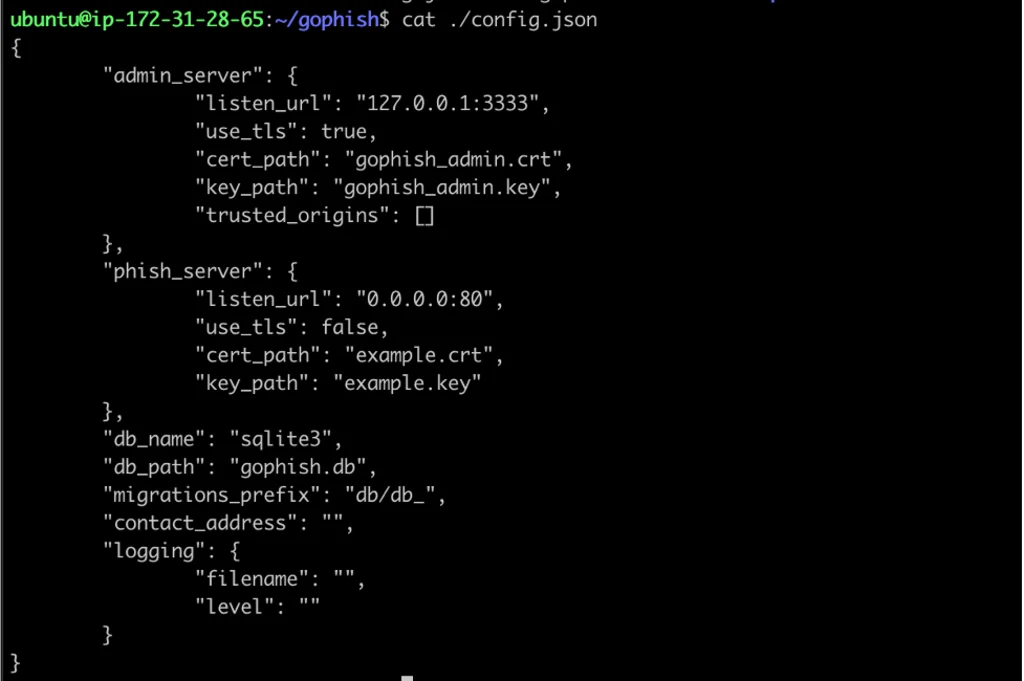
The configuration sections admin_server and phish_server contain, respectively, the settings for the admin server (where we will create and run campaigns) and the phishing server (responsible for hosting the phishing pages that we’ll add through the same admin account). These settings show us that as of now, the admin server is only available directly on the virtual machine via port 3333 and the phishing service is available on port 80 from the network. We can change our “admin_server.listen_url” in order to simplify our demo and make the Gophish admin available outside the virtual machine: “0.0.0.0:3333”. The easiest way to do this is with the nano console editor.
nano ./config.jsonWe can make our changes here. To exit the editor and save your changes, press control + X.
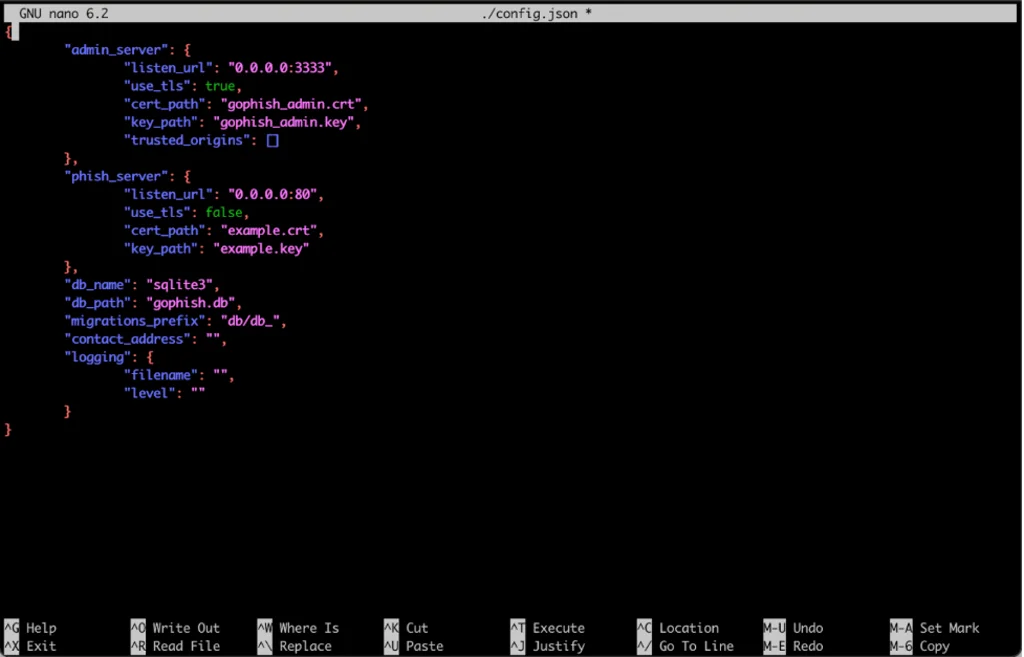
In a real scenario, you’d want the phishing server to host pages over HTTPS, which would give victims more confidence that your pages are legitimate. The config.json file is where you can change the ports and specify the SSL certification files. Alternatively, you can use Cloudflare Flexible SSL, while protects all of the communication between the browser and Cloudflare while allowing all traffic between Cloudflare and the phishing server to be sent over HTTP.
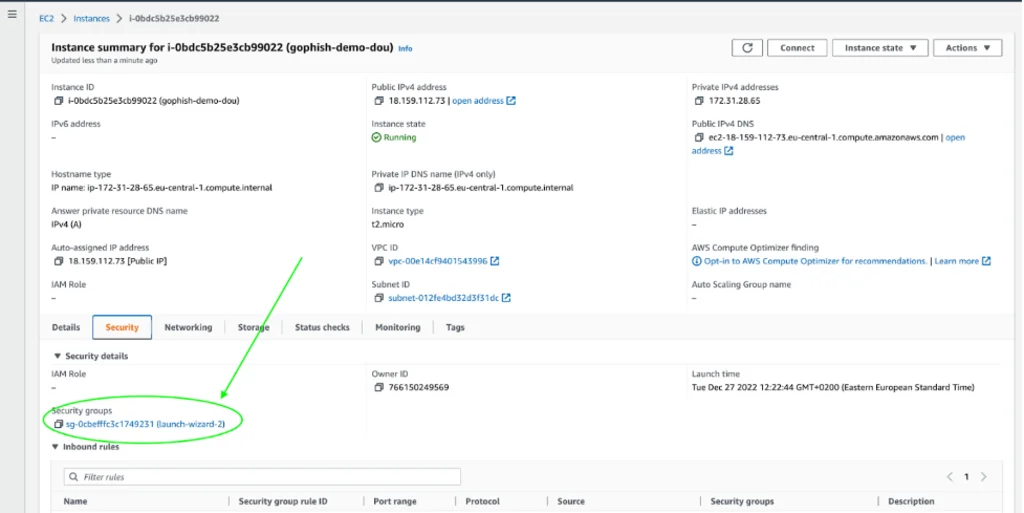
In order to allow access to the Gophish admin account from outside the virtual machine, we need to edit the virtual machine’s inbound traffic rules. To do this, navigate to the Security tab of the virtual machine’s settings and find the corresponding security group. On the Security Group page, click on “Edit inbound rules”.

Now let’s return to our virtual machine and make the file gophish executable by running the following command:
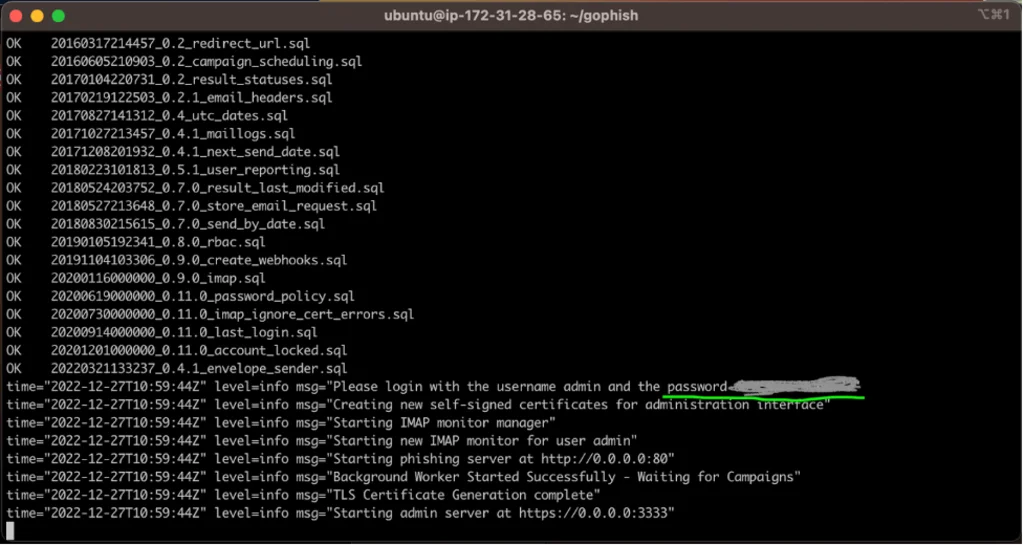
chmod +x gophishNow we can fire up our server. (We need to start the server with sudo in order to bind to privileged port 80.) One thing to remember, though – if we start the server this way, Gophish will stop working when the SSH session stops, which isn’t ideal in a real scenario. Optimally, we’d run the tool as a service and under a separate user, but we’ve skipped over this in order to keep this demo as simple as possible.
sudo ./gophishIn the console, we now see a message prompting the user for the admin password. It’s important to save this password and use it when logging in to Gophish for the first time as an admin. We can also see a message stating that the phishing server is running on port 80 and that admin server has been started on port 3333.
Let’s try to open the admin panel in a browser. We’ll need the IP address of our virtual machine (which can be viewed in the EC2 control panel) in order to do so. Enter the following in the address bar – https://[ip of the virtual machine]:3333 (my command looks like this, https://18.159.112.73:3333).

Congratulations! Our Gophish server is now working. Let’s use the temporary password from the previous step to log in as an admin. At first login, the system will ask us to designate a new password. After successful authorization, we can now see the Gophish interface.

Launching Your First Campaign with Gophish
Simulating a phishing attack is one of the best ways to better understand Gophish’s functionality. Imagine that you want to get access to user accounts on WordPress.org. The first thing we need is a bogus phishing page – for example, a simple login page. Let’s start our preparation there.
Landing Pages
This section allows you to create the HTML pages that your target will land on after clicking on a phishing link. The Landing Pages function allows you to save any data sent by the user, which greatly simplifies the work on our end. Let’s try to add a new page.
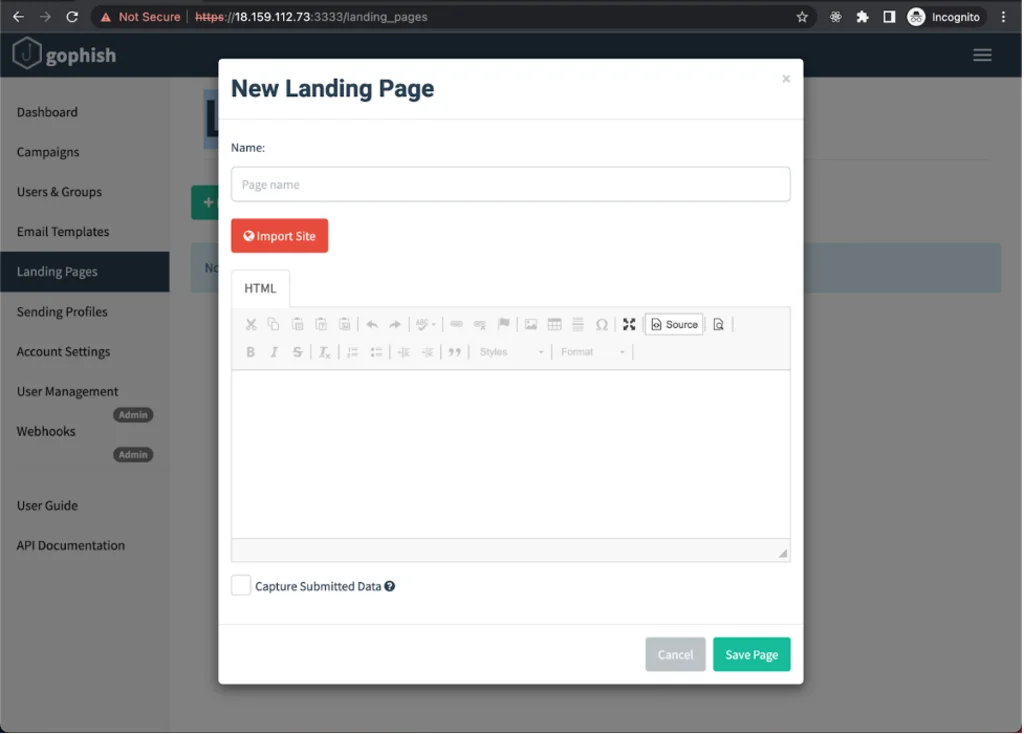
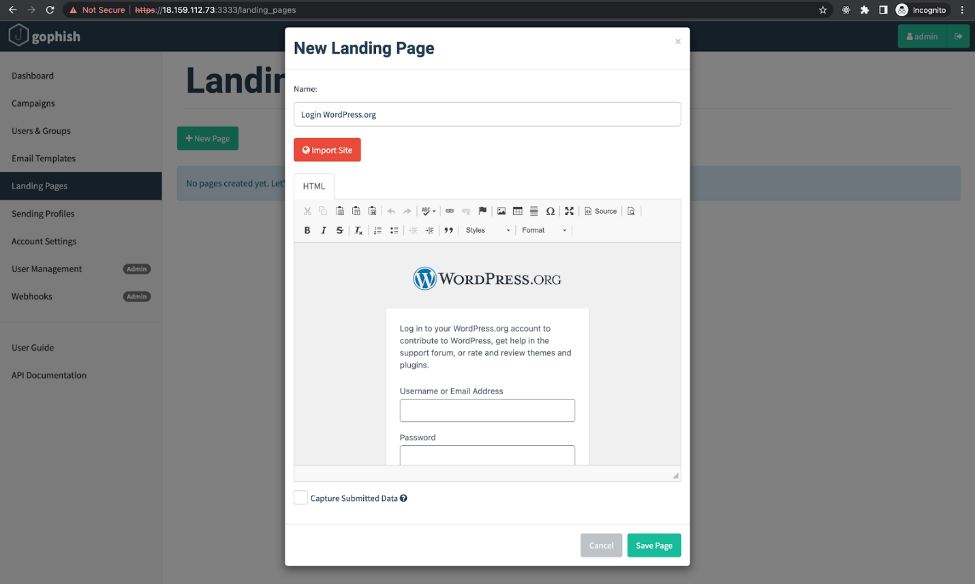
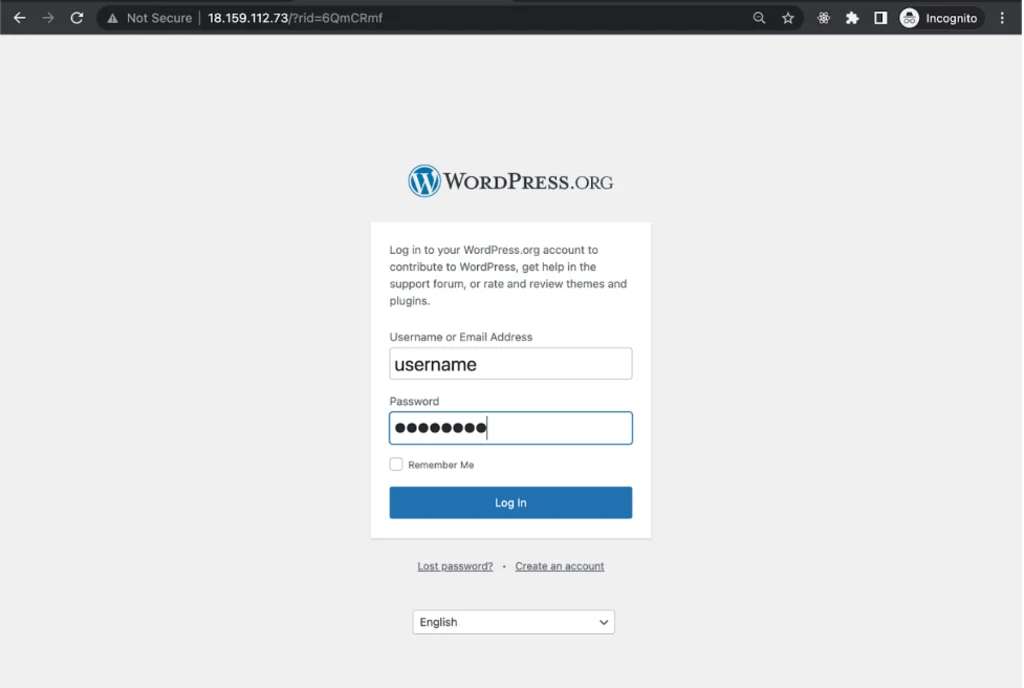
In the Landing Page creation form, you can add HTML pages or try to import a page from a website. Importing the page will not always work, though (for example, in instances where a form is rendered on the client side and not rendered by the server as a static page). Let’s try to import the login page now! https://login.wordpress.org WordPress.org. Click on “Import Site”, insert a link to the login page in the form that pops up, and click “Import”.

After the import form has closed, we can see a copy of the WordPress.org login page in the visual editor. At first glance, it looks pretty good! If you want to edit the page further, you can do so by switching to HTML Editing Mode.
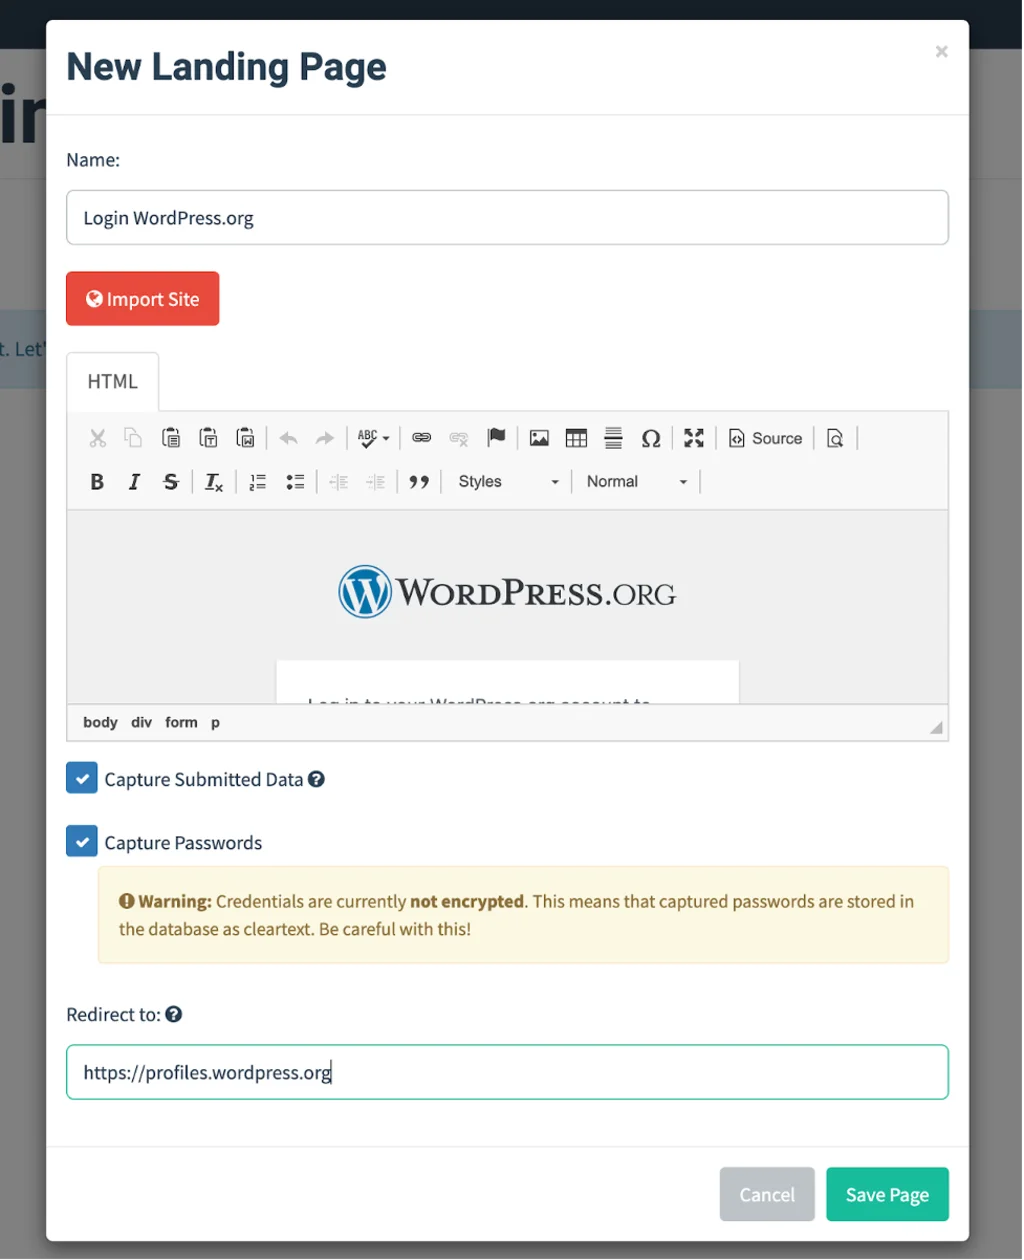
Since we are looking for user names and passwords, we’ll check the “Capture Submitted Data” box, as well as the box that will appear underneath it — “Capture Passwords”. Since we don’t want the user to become suspicious, let’s also specify that a victim should be redirected to their profile page after entering their login information.
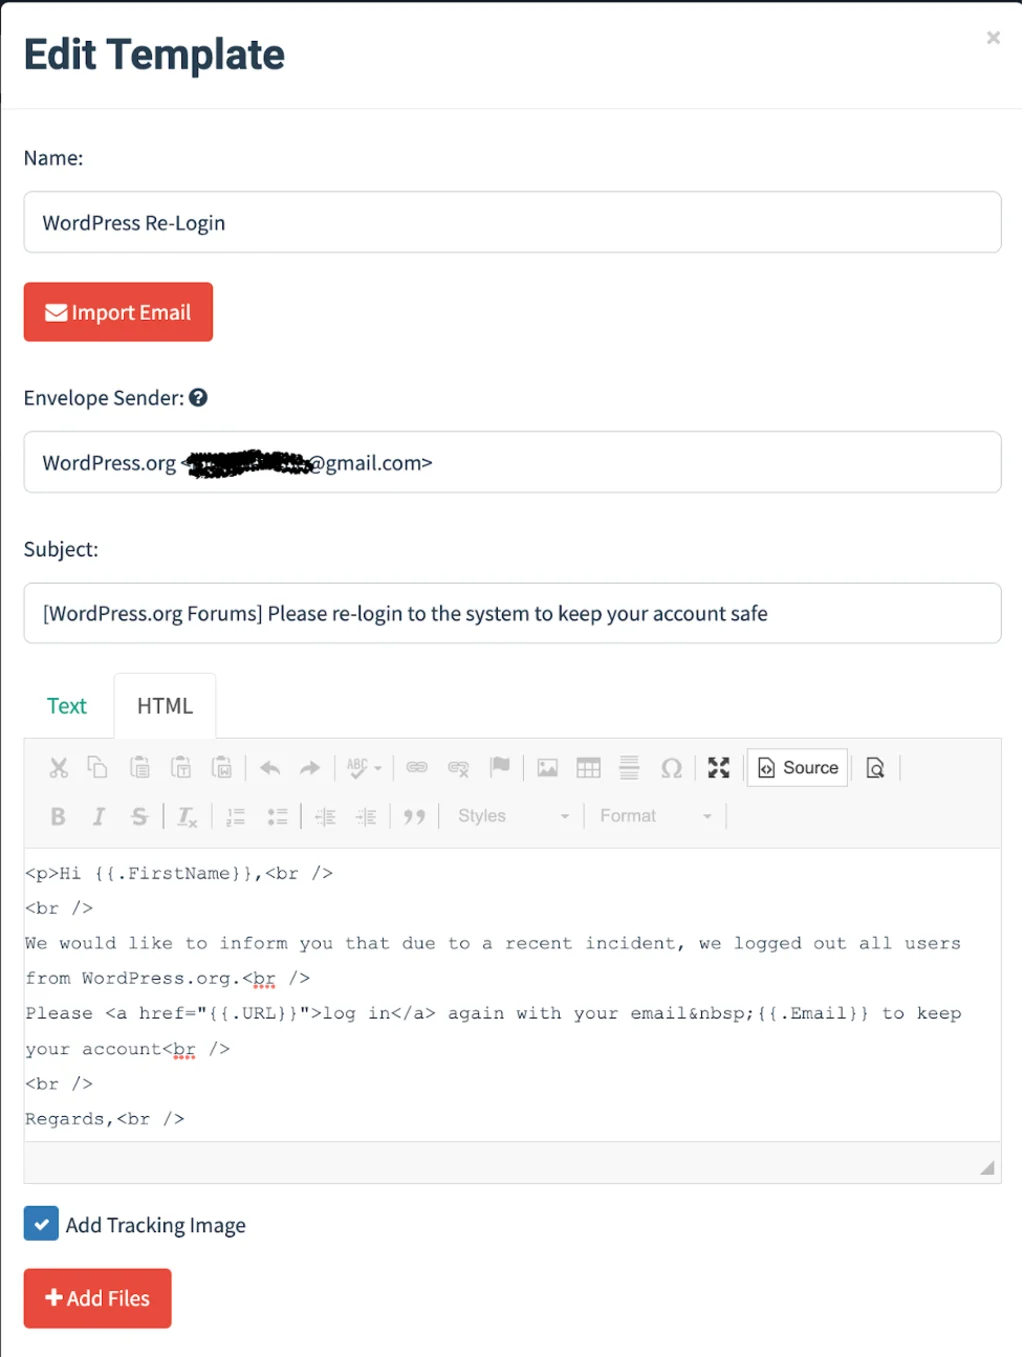
Email Templates
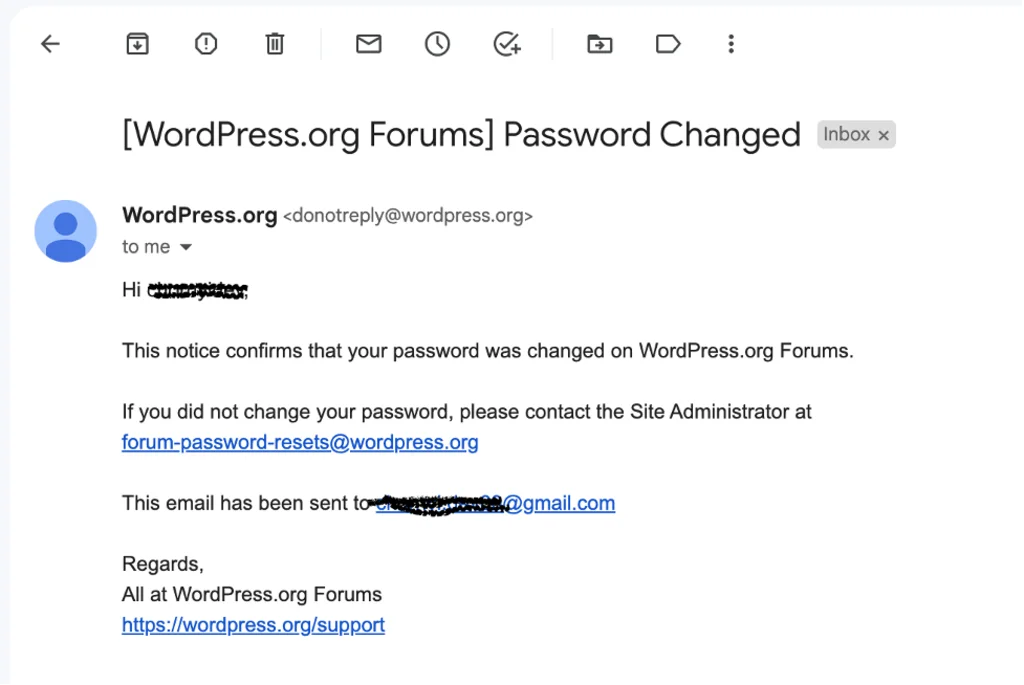
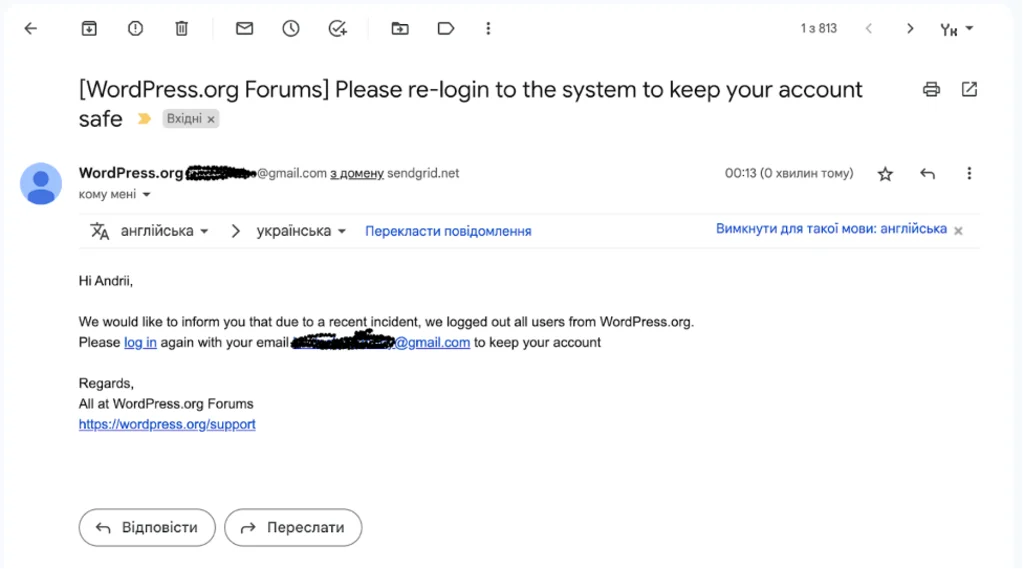
The next phase in our attack plan is crafting a phishing email that should redirect the target user to the landing page we’ve just created. By taking a close look at the password reset email that WordPress.org sends out to its users, we can see that the email contains simple text and is devoid of any complicated styles or images. This makes our work much easier.
Let’s try to craft an email that encourages the reader to click through to our phishing page and enter their credentials. For example, let’s inform them that all users need to do a fresh login in order to maintain access to their profile due to a recent security incident. Again, a real phishing campaign would a bit more ingenuity and effort.
Variables are an interesting aspect of the email templates, as they allow you to automatically substitute certain values in an email (for example, user name or email address). You can also import an existing email template if you wish.
We’ll check the “Add Tracking Image” box as well in order to collect statistics on the number of times that our emails are opened by our victims.
Gophish also allows you to add attached files to the email template, but let’s hold off on discussions on attachments for another article.
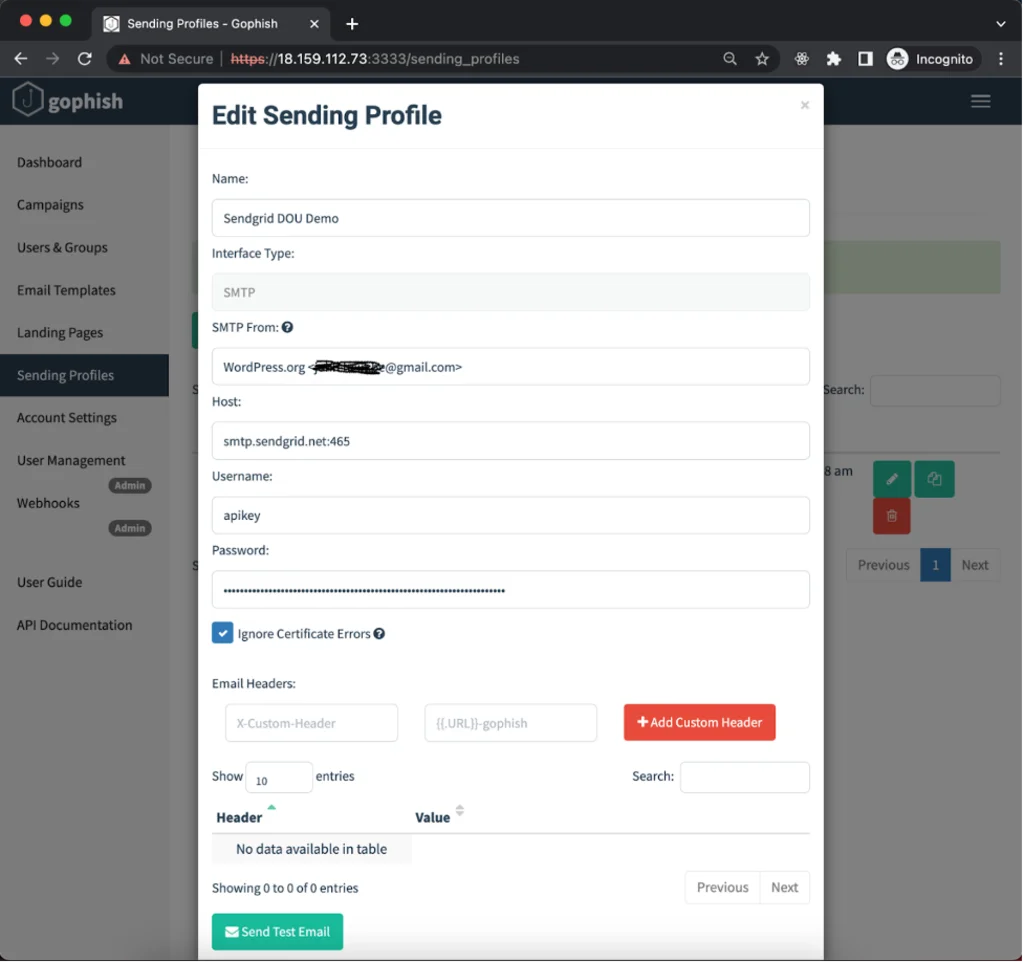
Sending Profile
The next thing we need is an SMTP server that will send off our emails, as Gophish isn’t capable of doing this by itself. For the purposes of our demo, we can use the SMTP of a popular email service such as SendGrid. SendGrid also allows you to send a certain number of emails for free, which is great for testing. After creating an account, SendGrid’s SMTP server details can be found in Email API -> Integration Guide -> SMTP Relay page.
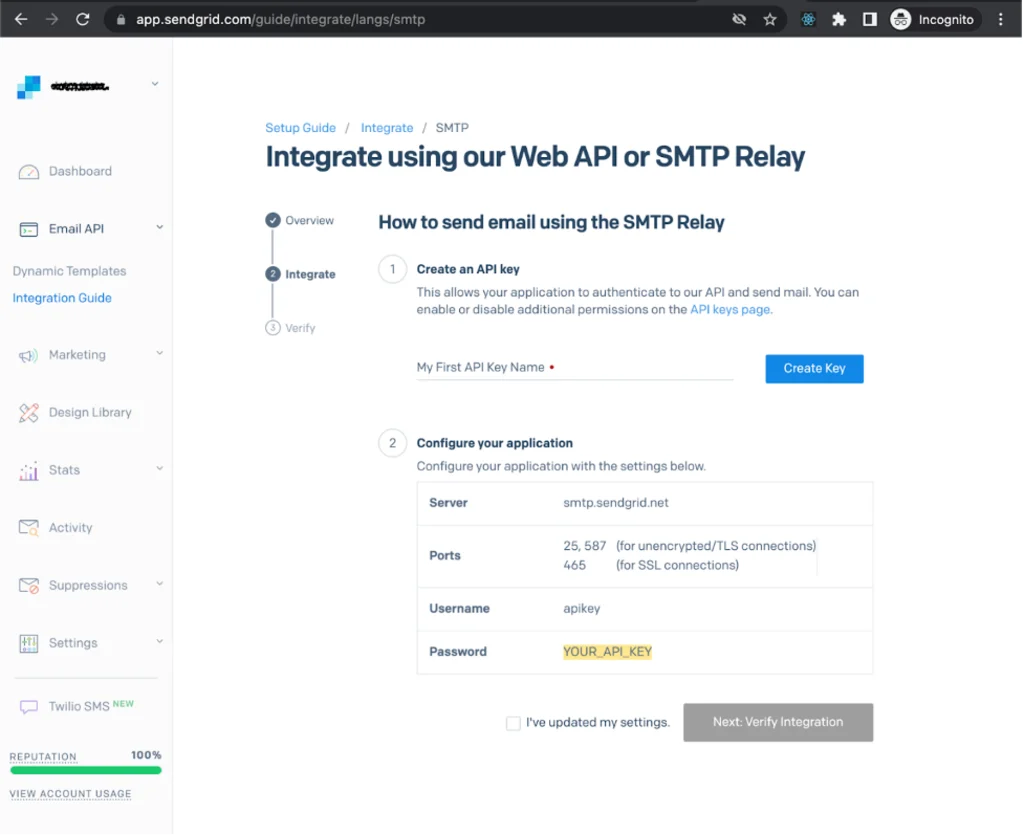
We will need this information later when adding a Sending Profile.
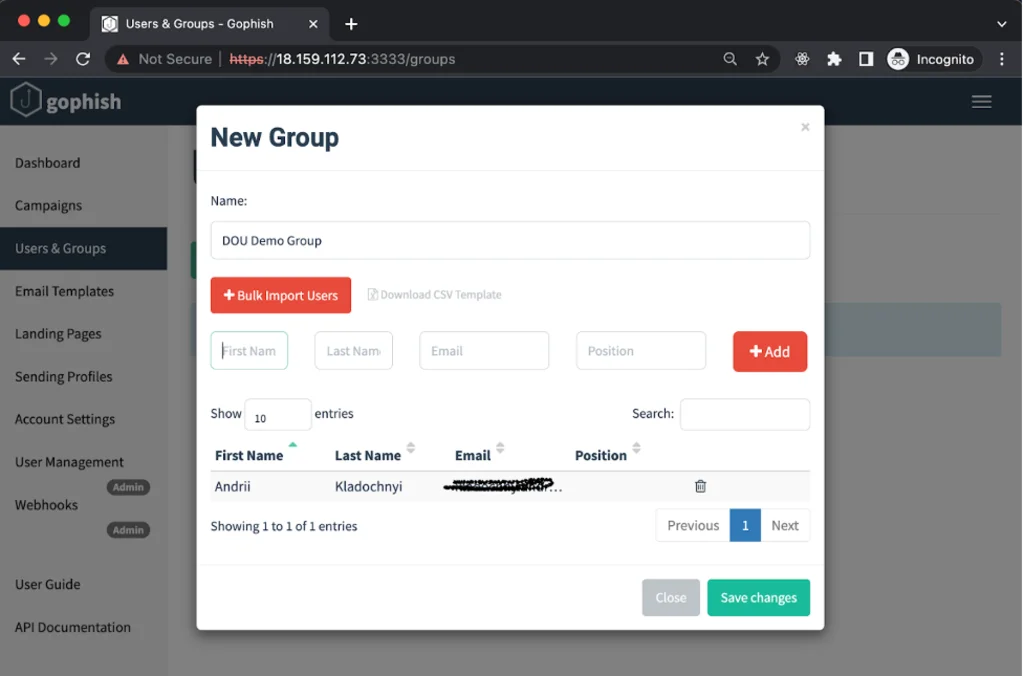
Users and Groups
The last thing we need to do is add the list of emails that will serve as the target of our attack. In the New Group form, you can add email addresses one at a time or import a group of addresses using a CSV file.
Campaigns
We’re finally ready to launch our first campaign! On the New Campaign form, select your email template, landing page, sending profile and the group of target emails you added in the previous step. You’ll also need to specify the URL where the phishing page will be hosted. In this case, we will use the IP address of the virtual machine where we deployed Gophish (“Public IPv4 address” in the EC2 control panel).
A real attack would require a static address for the virtual machine that is bound to your own domain. You can also designate the start time for your mail campaign. If we specify the time in the “Send Emails By” field, Gophish will divide the sending of phishing messages between these two time slots. When you’re ready, click on “Launch Campaign”.

After launch, we can track detailed information about our campaign’s progress.
Let’s go to the email account that was specified as our “destination” and verify whether we actually received an email.
Well, this looks like something really important! When we click on the link in the email, we are redirected to a page that’s very similar to the real login page for WordPress.org.
After a brief moment of consternation, the ideal victim would enter their user name and password and be redirected to their profile page (as we specified in the Landing Page settings) by clicking on the “Log In” button. If the victim is successfully logged in to the site, they may not notice anything at all.
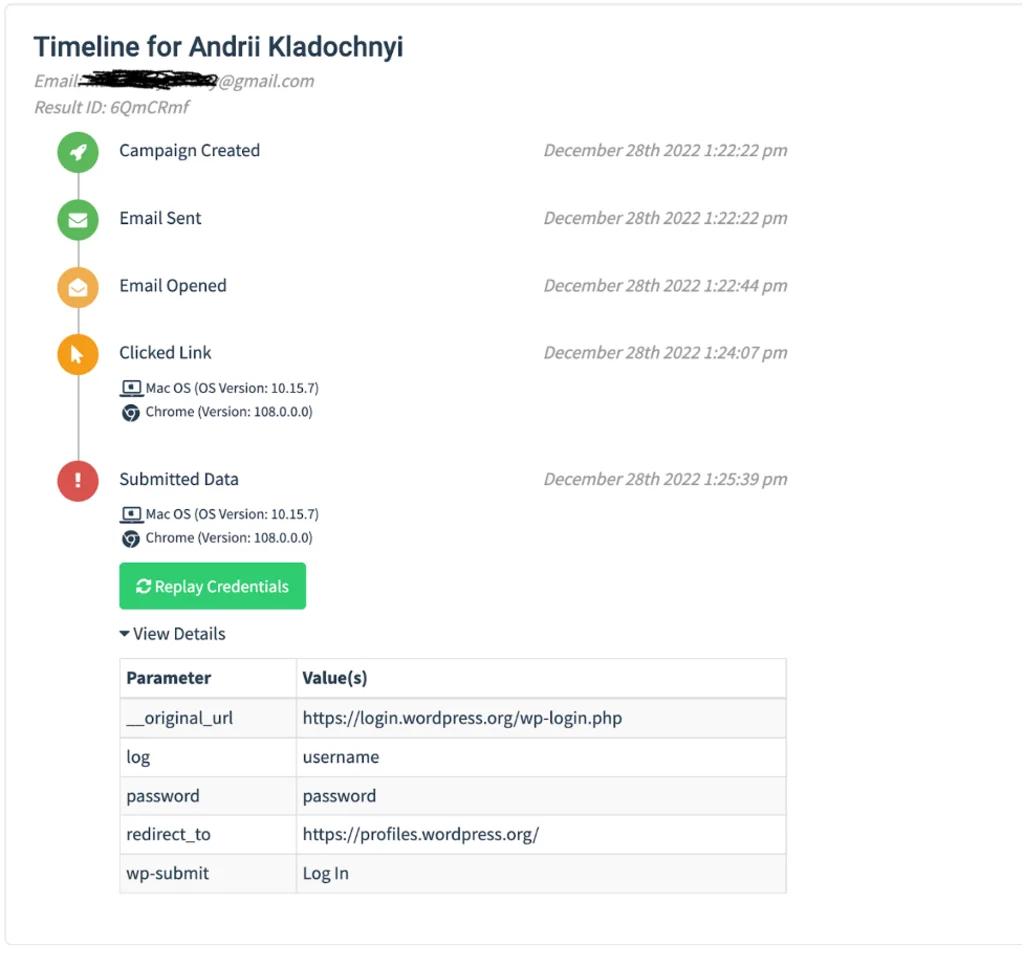
Now we have our first “catch”! Let’s see how this information is displayed on the Campaign Statistics page.
At the top of the Campaign Timeline, we can see all the events that are being tracked (Emails Sent, Emails Opened, Clicked Links, etc.).
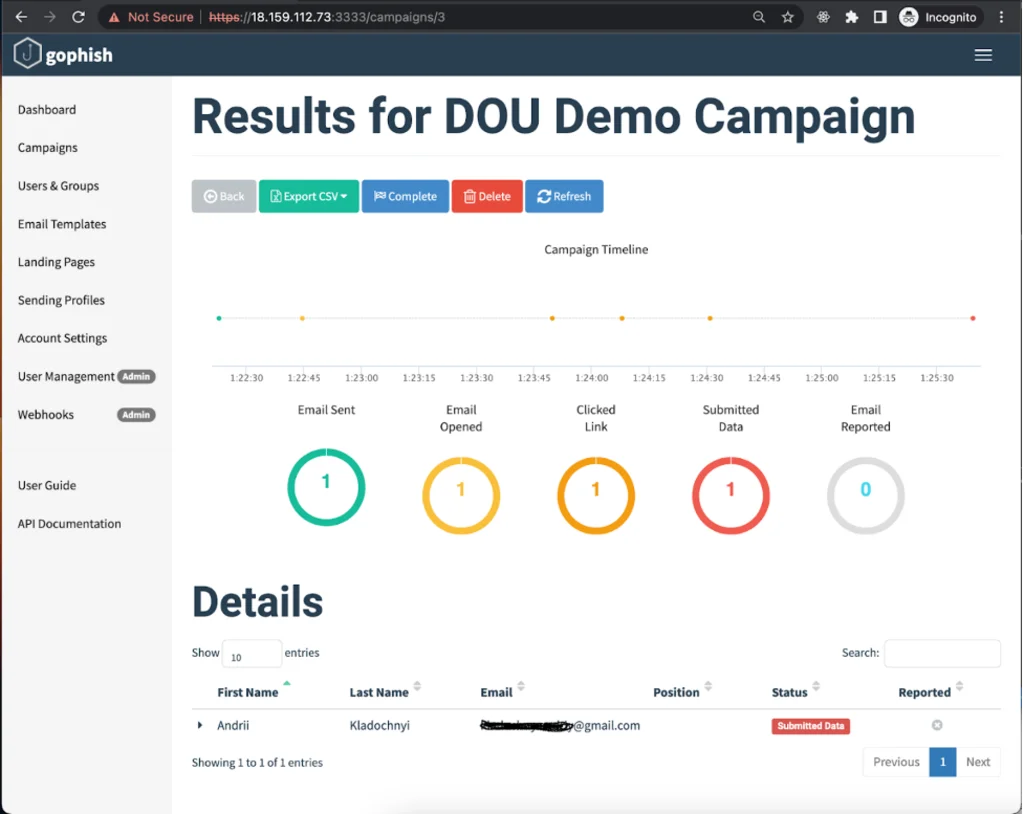
In the Details section below, we can also view statistics for each goal. We can see when the message was delivered, when it was opened by the user, which device the victim was using when they were redirected to the landing page and, most importantly, the data that they entered in the form.
Summary
I hope that this Gophish demo has given you an idea of what capabilities this framework offers, as well as a bit of knowledge about the preparation stages for phishing attacks, both simulated and real. Of course, our campaign was a bit rudimentary, so let’s take a second to brainstorm next steps that could be taken to prepare the tool for actual use.
- Selecting an SMTP server. We used an SMTP mailing service in this article, but that wouldn’t be a good idea if we were going to use Gophish for a real campaign. You should always check whether an SMTP server’s IPs are present on known spam lists such as Spamhaus.
- Choose a domain and bind it to the server that will be used to launch Gophish.
- Configure the phishing server to deliver landing pages via HTTPS – this will increase the credibility of your phishing pages.
- Configure DNS to use the chosen domain with your SMTP server (SPF, DKIM, DMARC DNS records).
- Work on the deliverability of your email. This is a more complex topic because there are a lot of factors that determine whether your message will end up in someone’s spam or in their inbox. These factors include everything from how correct your DNS settings are (as mentioned in the previous point) to the content of your email.
- You can experiment with the Mail Tester service. When you can reliably achieve the maximum score, continue experimenting with different email services, as they may have different approaches to detecting spam.
- Before sending out your emails, you should always “warm up” both your SMTP server and the mail account that you’ll be using for your campaign. One easy way to do this is to gradually send off batches of test emails with an increasing number of recipients (for example: Day 1 — 10 recipients, Day 2 — 20 recipients, Day 3 — 30 recipients, and so on, depending on the number of total recipients in your campaign). The way recipients react to your messages is also important. If they open your emails, scroll through them, click on the links, or mark them as “important”, the deliverability of messages from your SMTP server will improve.
Thanks for reading to the end of this article! Believe in Ukrainian victory! Slava Ukraine!
